How to Turn Your Pet’s Photo into Custom Stickers at Home
You can turn your favorite pet moments into something special right at home. Making stickers of pets is easy and brings a smile every time you see them. All you need is a good photo and a little creativity. When you make custom pet stickers, you get to show off your furry friend in a fun way. Many people love to make custom pet stickers for their notebooks, water bottles, or gifts.
Making stickers of pets is not just simple—it’s also a great way to get creative!
Key Takeaways
-
Get easy supplies like a clear pet photo, sticker paper, a printer, and scissors or a cutting machine before you begin.
-
Pick bright, clear photos of your pet that show their personality. Remove the backgrounds to help your stickers stand out.
-
Use design apps like Cricut Design Space or Procreate to add outlines, change the size, and make your stickers special.
-
Print your stickers on glossy or vinyl paper. Cut them by hand or with a machine for neat, pro shapes.
-
Cover your stickers with laminating sheets to make them waterproof and strong, so they last on water bottles, laptops, and more.
Materials & Tools
Supplies for Custom Pet Stickers
You do not need a lot of fancy tools to make custom pet stickers at home. You can start with just a few basic supplies. Here is a list of what you need:
-
A clear photo of your pet. Try to pick one with good lighting and sharp details.
-
A device for editing. Many people use an iPhone or iPad because they make background removal easy.
-
Design software or apps. Cricut Design Space works well if you use a Cricut machine.
-
Printer. The Epson ET-2850 is a favorite for printing custom pet stickers because it gives bright colors.
-
Sticker paper. Koala Mat Sticker paper and Cricut Brand sticker paper both work great. Glossy sticker paper makes your stickers look shiny and professional.
-
Scissors or a cutting machine. A Cricut Explore Air 2 or any Cricut Maker model helps you cut shapes perfectly. You can also use scissors if you do not have a machine.
-
Laminating supplies. These help your stickers last longer and stay safe from water.
-
Optional: A hair dryer. This can help set the ink and make your stickers dry faster.
Tip: Gather all your supplies before you start. This makes the process smooth and fun!
Where to Find Materials
You can find most supplies for custom pet stickers at craft stores or online. Here is a quick guide:
|
Item |
Where to Buy |
Recommended Brand |
|---|---|---|
|
Sticker Paper |
Amazon, Michaels, Joann |
Koala, Cricut |
|
Printer |
Best Buy, Amazon |
Epson ET-2850 |
|
Cutting Machine |
Cricut.com, Michaels |
Cricut Explore Air 2 |
|
Laminating Sheets |
Amazon, Walmart |
Scotch, Avery |
|
Design Software |
App Store, Cricut.com |
Cricut Design Space |
You can also check local stores for basic supplies like scissors and photo paper. If you want to try different sticker papers, order small packs first. This way, you can see which one you like best for your custom pet stickers.
Note: Many crafters love Cricut and Koala sticker paper because they are easy to use and give great results.
Photo Selection & Editing
Choose the Best Pet Photo
Picking the right photo is the first step to making amazing custom pet stickers. You want your stickers of pets to show off their personality and charm. Here’s what you should look for:
-
Pick photos that capture your pet’s unique expressions or special features.
-
Use photos taken in natural daylight or near a window. This helps show true colors and details.
-
Make sure your photos are high resolution and in sharp focus. Pay attention to the eyes and fur.
-
Stay away from blurry, dark, or low-quality photos. Avoid shots taken from far away.
-
Take photos at your pet’s eye level. This gives a natural look and avoids weird angles.
-
Try different poses and angles to see what works best for your stickers of pets.
-
If your pet wears a collar or harness you don’t want in the sticker, you can remove it later.
-
For group stickers of pets, use photos with similar lighting and angles for a matching look.
Tip: Open your photos app and scroll through your favorites. You might find the perfect shot you forgot about!
Remove Backgrounds
You want your custom pet stickers to pop, so removing the background is key. Many apps and online tools make this step easy. Look for these features:
-
AI background remover that works well with animals and pets.
-
Automatic subject detection for smooth, clear cutout edges.
-
Special tools for handling furry edges, like fluffy tails or ears.
-
Online editors for extra tweaks after removing the background.
-
Fast processing, even if you want to upload your pet sticker images in batches.
Here’s a quick table to help you pick a tool:
|
Feature |
Description |
|---|---|
|
Remove Image Background |
AI-powered tool to remove backgrounds quickly and accurately. |
|
Turns your pet into a cartoon for fun custom stickers of pets. |
|
|
Ease of Use |
Simple interface for fast, quality editing. |
|
Additional AI Tools |
Includes photo enhancers and cartoon effects for creative custom pet stickers. |
Edit for Stickers of Pets
Now you can get creative! Use cricut design space or your favorite editing app to make your stickers of pets stand out. When you upload your pet sticker images, keep these tips in mind:
-
Don’t crop out important parts like paws, tails, or ears. Leave some space around your pet.
-
Avoid making the colors too bright or unnatural. Stick to true colors for the best custom pet stickers.
-
Always edit from your pet’s eye level for a friendly, natural look.
If you use a cutting machine like cricut, you may want to convert your photo to SVG format. Cricut design space lets you upload your pet sticker images and adjust them for perfect cuts. You can add outlines, resize, and even cartoonize your pet for extra fun. Cricut design space makes it easy to turn any photo into a sticker you’ll love.
Note: Try different edits and see what looks best. Custom pet stickers are all about showing off your pet’s personality!
How to Make Custom Pet Stickers
Design in Software or Apps
You can start your sticker project by choosing the right design software or app. Many people use cricut design space because it works perfectly with cricut machines. You can also try Procreate if you have an iPad, or use online tools like the Dog Sticker Maker by Simplified. These apps help you make custom pet stickers with just a few taps.
Here are some popular options and what they offer:
-
cricut design space: Lets you upload pet photos, remove backgrounds, and add outlines. You can use it for print then cut projects.
-
Procreate: Great for drawing and adding personal touches to your stickers of pets.
-
Dog Sticker Maker by Simplified: Uses AI to help you make custom pet stickers fast. You can pick templates, add text, and use special pens or sketches.
-
AI Sticker Generator: Lets you create live stickers by typing what you want and picking a style. No design skills needed!
Tip: Try different apps to see which one feels easiest for you. Some tools even let you work with friends or family on the same project.
Add Outlines & Resize
Once you upload your pet photo into cricut design space, you can start editing. The outline, or “sticker border,” makes your custom pet stickers stand out. You can add a white or colored outline around your pet. This helps when you use print then cut with your cricut.
Follow these steps to add outlines and resize your stickers:
-
Open your pet photo in cricut design space.
-
Use the “Offset” tool to create a border around your pet. You can pick the thickness and color.
-
Check the edges. Make sure the outline looks smooth, even around fluffy fur or tails.
-
Resize your sticker. Drag the corners to make it bigger or smaller. Most people like stickers between 2 and 4 inches.
-
Group the image and outline together. This keeps everything in place when you print then cut.
If you use Procreate or another app, you can draw the outline by hand. Just use a pen tool and trace around your pet. Make sure you leave enough space so the sticker is easy to peel.
Note: Always leave a little extra space around your pet. This helps your cricut cut the sticker cleanly.
How to Make Live Stickers
You can turn your pet’s photo into live stickers that look like digital art. These stickers are fun for texting, social media, or even printing. Here’s how to make live stickers using cricut design space or other digital art software:
-
Upload your pet photo to the canvas in cricut design space.
-
Remove the background with the built-in tool. This makes your pet stand out.
-
Pick a new background. You can use a plain color or something fun.
-
Add digital art effects. Try cartoon, painting, or vector styles to give your pet a new look.
-
Add your pet’s name or a funny phrase if you want.
-
Save your live sticker as a high-quality file. You can use it online or print it with print then cut.
Callout: Isolating your pet and adding effects on a separate layer lets you use the image anywhere—no background needed!
If you want to know how to make live stickers quickly, many apps now offer AI-powered tools. You just upload your photo, pick a style, and the app does the rest. This makes it easy to make custom pet stickers for any occasion.
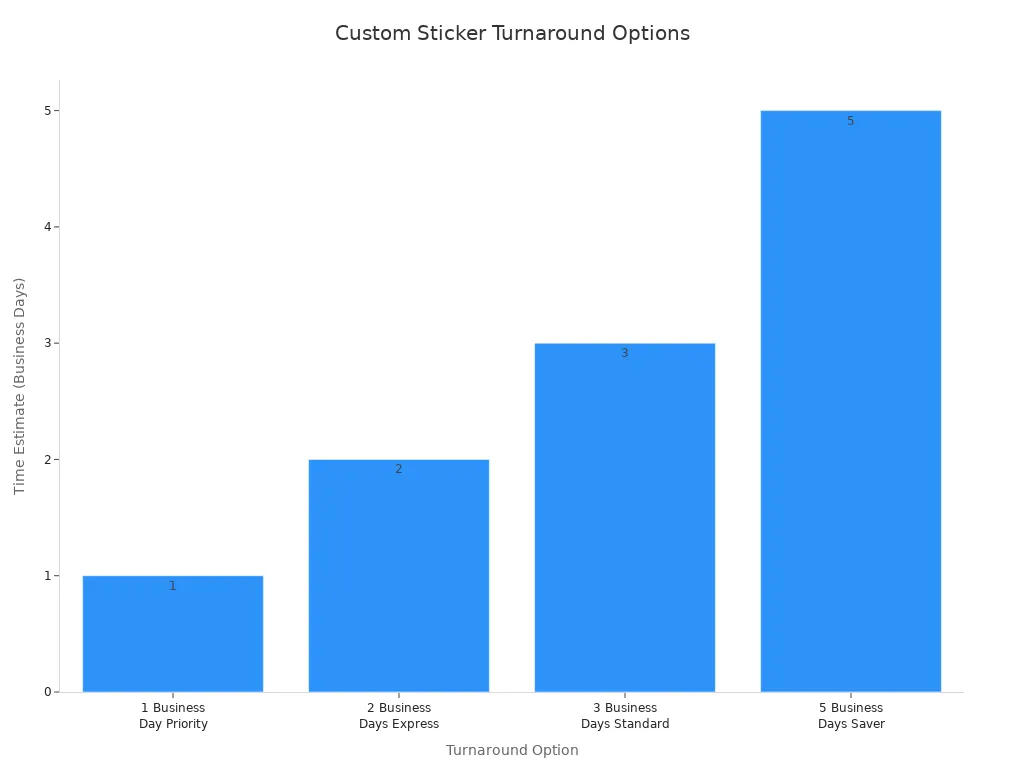
How Long Does It Take?
You might wonder how much time you need to make custom pet stickers. Here’s a quick look at the usual turnaround times:
|
Turnaround Option |
Time Estimate |
Start of Turnaround Time |
Notes |
|---|---|---|---|
|
1 Business Day Priority |
1 business day |
From file upload completion or proof approval |
Orders approved after 5:00 PM CST processed next business day; emergency rushes possible. |
|
2 Business Days Express |
2 business days |
From file upload completion or proof approval |
Same conditions as above. |
|
3 Business Days Standard |
3 business days |
From file upload completion or proof approval |
Most popular option; includes production and shipping time; same processing rules apply. |
|
5 Business Days Saver |
5 business days |
From file upload completion or proof approval |
Cost-saving option; includes production and shipping; same processing rules apply. |
You can see that making custom pet stickers at home is much faster than waiting for shipping. When you use cricut design space and print then cut, you can finish your stickers in just a few hours.
Tip: Save your favorite designs in cricut design space. You can reuse them to make custom pet stickers for gifts, parties, or just for fun.
Now you know how to make custom pet stickers and live stickers from your pet’s photo. You can use cricut, Procreate, or online tools to create stickers that show off your pet’s personality. Try different styles, add outlines, and use print then cut to bring your ideas to life. Making live stickers is easy and fun, and you can share them with friends or use them on your favorite things.
Print & Cut
Print on Sticker Paper
Now comes the fun part—printing your stickers! You want your custom pet stickers to look bright and last a long time. Start by loading your printer with glossy or vinyl sticker paper. Glossy paper makes colors pop, while vinyl gives you extra strength and a pro finish.
Before you hit print, check your printer settings. Set it to “photo mode” for the best color and detail. If you want to save ink, you can try “draft quality,” but photo mode usually gives the sharpest results. Always print a test page first to see how your design looks.
Here’s why your choice of sticker paper matters:
-
Thick, durable vinyl sticker paper protects your artwork and keeps your stickers looking new.
-
High-quality vinyl with eco-solvent inks gives you vibrant colors and weatherproof stickers.
-
Some sticker papers have UV protection, so your stickers won’t fade in the sun.
-
Weatherproof adhesives help your stickers stick, even on wet or outdoor surfaces.
-
Using sustainable materials and eco-friendly inks is better for the planet and makes your stickers last longer.
Tip: Let your printed sheet dry for a few minutes before touching it. If you want to speed things up, use a hair dryer on a low setting to help set the ink.
Cut by Hand or Machine
Once your stickers are printed, it’s time to cut them out. You can use scissors or a cutting machine like a Cricut. If you want perfect shapes and smooth edges, a Cricut makes it easy with the print then cut feature. Just load your printed sheet into the machine, line it up, and let the Cricut do the work.
If you don’t have a cutting machine, don’t worry! Grab a pair of sharp scissors and cut around your design. Leave a small border if you want that classic sticker look. For extra help, place your sticker sheet on top of parchment or wax paper. This makes it easier to peel off the backing later.
Here’s a quick look at your options:
|
Cutting Method |
Best For |
What You Need |
|---|---|---|
|
Cricut (print then cut) |
Perfect shapes, lots of stickers |
Cricut machine, mat |
|
Scissors (by hand) |
Small batches, simple designs |
Sharp scissors, patience |
|
Wax/Parchment Paper |
Easy peeling, hand cutting |
Wax/parchment paper |
Callout: If you use print then cut, always double-check your machine’s calibration. This helps you avoid cutting mistakes and wasted sticker paper.
Seal for Durability
You want your custom pet stickers to last, right? Sealing them makes a huge difference. The best way to make your stickers water-resistant and tough is to use self-adhesive laminating sheets. These clear sheets stick right over your stickers and add a protective layer.
Here’s what makes sealing so important:
-
Self-adhesive laminating sheets make your stickers waterproof and strong.
-
They work better than heat laminating for water resistance.
-
Printable vinyl is already tough, but adding a laminate layer gives you even more protection.
-
Different brands offer different thicknesses. Avery sheets are thin and flexible—great for water bottles. Royal Elements and Violetta sheets are thicker and work well for outdoor use, like on cars or bikes.
-
You can cut laminated stickers with a Cricut using print then cut, or by hand, and they’ll stay waterproof.
-
Laminating gives your stickers a shiny, professional finish. This is perfect if you want to sell your stickers or use them for a long time.
Note: Always press down the laminate sheet smoothly to avoid bubbles. If you see any, use a flat tool or a credit card to push them out.
When you follow these steps, your print then cut custom pet stickers will look amazing and last a long time. You can even make a custom vinyl sticker that stands up to rain, sun, and lots of handling. Try sealing a few stickers and see the difference for yourself!
Use Your Stickers
Apply & Share
You finally have your custom pet stickers ready! Now comes the fun part—using them everywhere. Stick a dog sticker on your water bottle or laptop. You can decorate your phone case or even your school binder. If you have a favorite notebook, add a dog sticker to the cover. These stickers look great on skateboards, helmets, or lunchboxes, too.
Want to make someone smile? Give a sheet of custom pet stickers as a gift. Friends and family love getting a dog sticker with your pet’s face on it. You can even use a custom dog decal to decorate your car window or mailbox. If you have a party, hand out dog stickers as party favors. People love trading and collecting them!
Tip: Share your creations online. Post a photo of your dog sticker on social media and tag your friends. You might inspire others to make their own custom pet stickers.
Storage Tips
You want your stickers to stay fresh and sticky. Store your dog sticker sheets in a cool, dry place. Keep them flat in a folder or envelope. If you have lots of custom pet stickers, use a small box or a zippered pouch. This keeps them safe from dust and sunlight.
Here are some quick storage ideas:
-
Use a plastic photo album to organize your dog sticker collection.
-
Place wax paper between sticker sheets so they don’t stick together.
-
Label your storage box if you have different types, like custom dog decal or cat stickers.
|
Storage Method |
Best For |
Extra Tip |
|---|---|---|
|
Photo Album |
Collecting dog stickers |
Easy to flip through and share |
|
Zippered Pouch |
Carrying on the go |
Keeps stickers from bending |
|
Envelope or Folder |
Flat storage |
Protects from dust and sunlight |
Note: Always keep your stickers away from heat and water. This helps them last longer and look great every time you use a dog sticker.
You can start making your own custom pet stickers today. Try out new photos and play with different designs. Share your creations with friends or post them online. Here are some cool trends for 2024 you might want to try:
-
Eco-friendly sticker materials
-
Interactive stickers with QR codes or AR
-
Retro and nostalgic styles
-
Minimalist designs with bold words
Minimalist playfulness is also big this year. Simple shapes and funny phrases, like “Fetch Happens,” make your stickers stand out. Have fun and let your creativity shine! 🐾
FAQ
How do I keep my stickers from peeling off?
Make sure you clean the surface before you stick your sticker. Press down firmly. If you want extra hold, use a clear laminate sheet. This helps your sticker stay put longer.
Tip: Avoid sticking on wet or dusty surfaces for best results.
Can I make stickers without a Cricut machine?
Yes! You can use sharp scissors to cut out your stickers by hand. Just print your design on sticker paper, then carefully cut around the edges. It works great for small batches or simple shapes.
What kind of printer works best for stickers?
An inkjet printer gives you bright colors and sharp details. The Epson ET-2850 is a popular choice. Always use the “photo” setting for the best results. Let your stickers dry before touching them.
Are homemade stickers waterproof?
Homemade stickers can be water-resistant if you use vinyl sticker paper and seal them with a laminating sheet. For full waterproofing, always add a clear laminate layer. This protects your stickers from spills and rain.
Note: Laminated stickers last longer on water bottles and outdoor gear.
See Also
Guide To Crafting Unique Custom Action Figures Yourself
Steps For Designing Personalized Figurines From Scratch
Transform Your Roblox Character Into A Physical Toy
Creating A Roblox Toy Based On Your Avatar Easily
Complete Stepwise Instructions For Personalizing Roblox Figures


