How to draw cute stickers for beginners
You can create a cute sticker even if you have never tried cute stickers drawing before. Drawing something cute does not need fancy skills or special tools. Grab some paper or open your favorite drawing app. Let your imagination lead you. Try different faces, shapes, and colors. Have fun and make each sticker your own!
Key Takeaways
-
Start drawing cute stickers with simple shapes like circles and hearts to create fun characters.
-
Use basic tools like pencils, erasers, and colored pens or digital apps like Procreate to bring your stickers to life.
-
Add big eyes, small mouths, and soft colors to make your stickers look extra cute and friendly.
-
Print your designs on sticker paper and cut them out by hand or with a cutting machine for neat edges.
-
Keep practicing, try new ideas, and enjoy the process to improve your sticker drawing skills.
Tools for Cute Sticker Drawing
Before you start drawing your cute stickers, you need the right tools. You can use traditional supplies or digital tools. Both ways work great, so pick what feels best for you!
Traditional Supplies
You do not need fancy art supplies to get started. Many beginners use simple items you might already have at home. Here are some essentials:
-
Scissors (regular, non-stick, or small detail scissors for tricky cuts)
-
Erasers for fixing mistakes
-
Craft knives for detailed cutting
-
Paper cutters or trimmers for straight edges
You can also try this basic art supply list:
1. Graphite pencils (HB, 2B, 4B, 6B) for sketching 2. Erasers (regular and kneaded) for clean corrections 3. Pencil sharpeners to keep your lines sharp 4. Blending tools like tortillons for smooth shading 5. Colored pencils for bright colors 6. Markers (alcohol or water-based) for bold, flat color 7. Colored pens and fine liners for crisp outlines
Tip: Sticker paper or full-sheet label paper makes it easy to turn your drawings into real stickers. You can also use wax paper and tape for a DIY approach.
Digital Tools
If you want to draw stickers on a tablet or computer, you have lots of choices. Many beginners love Procreate because it feels natural and is easy to use on an iPad. Adobe Fresco is another good pick if you want both raster and vector drawing. Canva and Vectornator are free and beginner-friendly. Sketchbook is also a solid choice for simple sticker art.
Here’s a quick look at some popular apps:
|
App Name |
Why Beginners Like It |
Price |
|---|---|---|
|
Procreate |
Realistic brushes, easy to use |
$9.99 (iPad) |
|
Canva |
Simple, free, good for quick designs |
Free/$ |
|
Vectornator |
Intuitive vector tools, free |
Free |
|
Sketchbook |
Custom brushes, multi-platform |
Free |
|
Adobe Fresco |
Raster + vector, unlimited layers |
Free/$ |
|
Adobe Illustrator |
Advanced, for complex designs |
Subscription |
Cutting machines like Cricut can make your sticker-making process even easier. They help you cut out your stickers with perfect edges and let you create lots of stickers quickly. If you want to make a bunch of stickers or sell them, a Cricut is a great tool to try!
How to Draw Stickers
Drawing cute stickers can feel easy and fun when you break it down into simple steps. You do not need to be an expert to make adorable designs. Let’s walk through the process together!
Sketch Simple Shapes
Start with the basics. Grab your pencil and lightly draw simple shapes like circles, ovals, or rectangles. These shapes form the base for most cute stickers drawing projects. For example, a circle can become a chubby cat face, a heart can turn into a smiling strawberry, and a rectangle might become a happy toast.
Tip: Use big heads and small bodies to make your characters look extra cute. This style follows the baby schema principle, which means people find these proportions more adorable.
Try sketching animals, food, or even hearts. These subjects are popular for beginners and always look cute as stickers. You can also experiment with different postures or expressions to give your characters more personality. Sketching and details come later, so keep your first lines light and simple.
Add Cute Details
Now it’s time to bring your sketches to life! Add big, expressive eyes and tiny mouths. These features make your stickers look friendly and sweet. Round out the cheeks, add blush marks, or draw little paws and ears. You can even give your characters accessories like bows, hats, or glasses.
-
Kawaii style is all about exaggerating features. Make the eyes large and shiny.
-
Try adding sparkles, hearts, or stars around your characters for extra charm.
-
If you want your stickers to stand out, add glitter or holographic effects with special pens or digital brushes.
Many trending sticker designs use hand-drawn lines. This gives your art a personal touch and makes it feel warm and unique. You can also turn everyday objects, like coffee cups or fruit, into cute characters by giving them faces and playful expressions. Sketching and details at this stage help your sticker pop.
Outline and Color
Once you finish your sketch, go over your lines with a darker pen or marker. This step makes your design bold and easy to see. If you work digitally, use a new layer for your outline. Clean, smooth lines help your stickers look professional.
When you color your stickers, pick a color palette that fits your theme. Complementary colors (like blue and orange) make your art vibrant. Analogous colors (like pink and purple) create a soft, harmonious look. Beginners often start with a few colors to keep things simple and avoid making the design too busy.
-
Use ink gel pens for bright details and bold outlines.
-
Try colored pencils or markers for smooth shading.
-
If you draw digitally, apps like Procreate let you experiment with different brushes and effects.
Note: Finish your outline before coloring. This helps you see which colors work best and keeps your sticker neat.
You can test your design by turning it black and white. This trick shows if your sticker has enough contrast. Once you’re happy, your cute stickers drawing is ready for the next step—printing or sharing!
How to Draw Stickers in Procreate
Ready to make your own digital stickers? Let’s walk through how to draw stickers in procreate, step by step. You’ll see how easy it is to set up your canvas, use layers, and get your art ready for printing or cutting.
Set Up Canvas
Start by opening Procreate and tapping the + icon to create a new canvas. For stickers, you want your design to look sharp when printed. Here’s a simple setup:
-
Choose a custom canvas size. Set it to 8.5 x 11 inches or 850 x 1100 pixels. This matches standard sticker paper.
-
Set the resolution to 300 DPI. This keeps your stickers crisp and clear.
-
Pick the CMYK color mode. This helps your colors print accurately.
-
Double-check your settings before you start drawing.
Tip: Always confirm your canvas size and resolution before you begin. This saves you from blurry or pixelated prints later.
Layer and Color
Layers make your sticker art easier to manage. You can sketch, color, and add details without messing up your main drawing. Here’s how layers help you:
-
Use one layer for your sketch. Add another for your outline. Put colors on a third layer.
-
Move parts of your design around by working on separate layers.
-
Group and merge layers to keep things tidy. This helps you stay organized, especially if you have lots of stickers on one page.
-
Add a white border on a layer below your art. This gives your sticker a clean edge and makes it easy to cut out.
-
Layers let you fix mistakes fast and try new ideas without starting over.
If you want to know how to draw stickers in procreate like a pro, practice using layers for every part of your design.
Export for Printing
When your sticker looks perfect, it’s time to export. You want your file to print well and work with cutting machines like Cricut. Follow these steps:
-
Export your sticker as a PNG file. This keeps the background transparent, which is great for stickers with fun shapes.
-
Make sure your export resolution is 300 DPI for sharp prints.
-
Print at home with a good inkjet printer, like Canon or Epson. Use vinyl sticker paper for best results.
-
Adjust your printer settings to ‘Best’ or ‘Photo Quality’ and pick the right paper type.
-
If you use a print shop, send them a high-res PNG or PDF with a transparent background.
-
Try a test print on plain paper first. Check the size and colors before using your sticker paper.
Note: If you want to know how to upload from procreate to cricut, save your PNG file and import it into Cricut Design Space. This lets you cut out your stickers with perfect edges.
Now you’re ready to print and share your cute creations!
How to Make Stickers
So, you’ve finished your cute sticker art—now let’s turn it into real stickers you can use or share! Learning how to make stickers is simple when you follow a few easy steps. You can print and cut your stickers at home or try some fun DIY sticker methods.
Print and Cut
You can print your stickers using a regular inkjet printer and sticker paper. Here’s how to make stickers from your digital or hand-drawn art:
-
Save your artwork as a PNG file with a transparent background. This keeps your sticker shapes clean.
-
Print your design on full-sheet label paper or vinyl sticker paper. Vinyl works best for waterproof and durable stickers.
-
Use scissors or a craft knife to cut out each sticker. For perfect edges, try a cutting machine like Cricut or LOKLiK iCraft.
-
Leave a white border around your design. This makes your stickers pop and helps with cutting. If you want to know how to make borders for stickers, just add a white outline in your drawing app or leave space when cutting by hand.
-
Test your cuts first to make sure everything lines up. Good lighting helps your machine read the marks on the sticker paper.
Tip: Matte vinyl sticker paper is great for most projects, but shiny paper may need extra care for cutting machines.
DIY Sticker Methods
If you want to know how to make stickers without fancy tools, try these easy DIY methods:
-
Print your art on regular paper, then cover it with clear packing tape or contact paper for a glossy, water-resistant finish.
-
Cut out your design and stick double-sided tape or glue on the back.
-
Use wax paper as a backing if you want to make peel-off stickers.
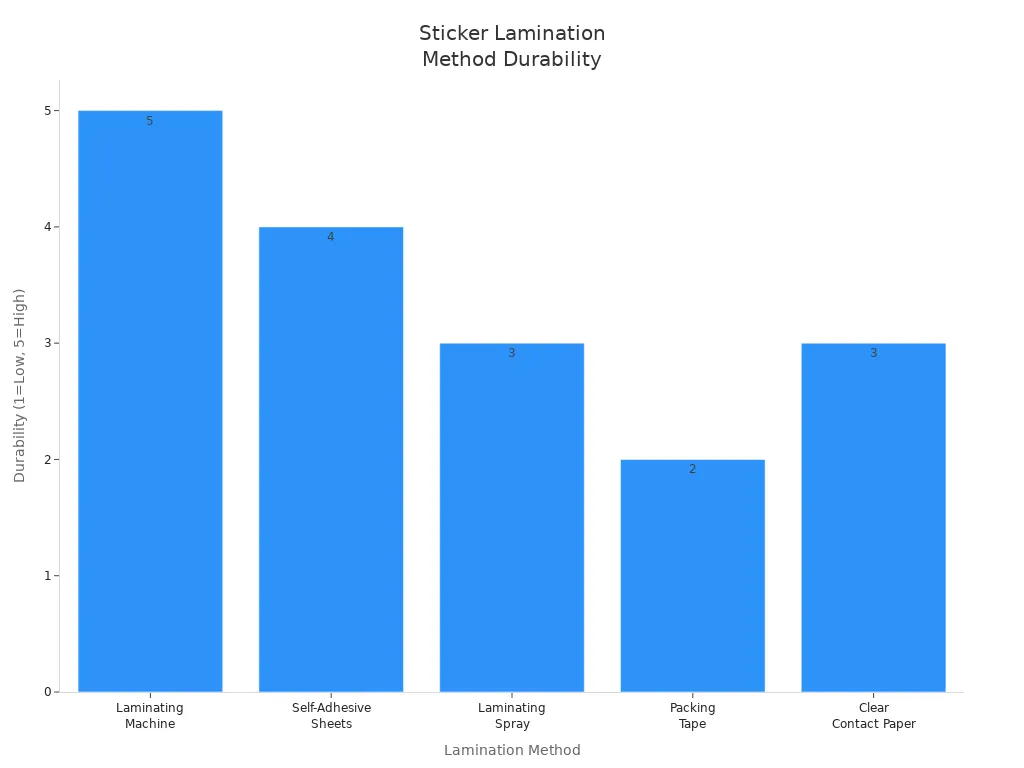
Here’s a quick look at lamination options:
|
Lamination Method |
Budget |
Tools Needed |
Durability |
Best For |
|---|---|---|---|---|
|
Packing Tape |
Low |
Tape, scissors |
Low-Moderate |
Quick, small projects |
|
Self-Adhesive Sheets |
Low-Medium |
Sheets, scissors |
Moderate-High |
DIY, beginners |
|
Laminating Machine |
Medium-High |
Machine, pouches |
High |
Large, pro batches |
When you explore how to make stickers, you’ll notice that paper-based sticker sheets work well for indoor use, while vinyl sheets last longer outdoors. If you care about the environment, try biodegradable or recycled paper stickers. These break down naturally and help reduce waste.
Making mistakes is normal when you learn how to make stickers. Try different materials and methods until you find what works best for you!
Cute Stickers Drawing Tips
Inspiration Ideas
Do you need new ideas for your cute stickers drawing? You can get inspired almost anywhere. Many artists look at Pinterest to see what stickers are popular. You can also check Etsy or Amazon for trending designs. Your hobbies and interests can help you come up with special sticker themes.
Here are some fun places to get ideas:
-
Pop culture, like movies, TV shows, or video games you enjoy
-
Nostalgic things, such as old toys or classic cartoons
-
Nature, including flowers, animals, and weather with happy faces
-
Food and drinks, like smiling desserts or cute coffee mugs
-
Friendship duos, such as fox and raccoon pairs or best friend hearts
-
Motivational quotes and positive sayings
Tip: Watch YouTube tutorials for step-by-step ideas and new ways to draw. You can also follow sticker artists on Instagram for daily inspiration.
Make Stickers Extra Cute
You want your stickers to be special and make people happy. Here are some easy ways to make your cute stickers drawing even cuter:
-
Use simple, round shapes for your characters. Circles and ovals look soft and friendly.
-
Draw big, shiny eyes and small mouths. Faces with lots of expression look more lovable.
-
Pick soft, pastel colors or bright, happy shades. These colors make your stickers look playful.
-
Add blush marks, sparkles, or hearts for extra cuteness.
-
Keep your designs simple. Too many details can make stickers look messy.
-
Try fun patterns or summer-themed words for a cool twist.
You can turn almost anything into a cute sticker by adding a face and a smile. The best cute stickers drawing comes from your imagination and practice.
You get better at art each time you draw a cute sticker. You will make mistakes, but they help you learn new things. Try out different styles and sketch as much as you can. Show your stickers to friends or post them online. Drawing stickers can make you feel happy and help you focus. It is also a fun way to show your feelings.
Remember, your art journey is special—enjoy every part!
If you want to get better, try these helpful resources:
|
Resource Name |
Focus Area |
Why It Helps Sticker Artists |
|---|---|---|
|
How To Draw a Cat (YouTube) |
Cat anatomy and form |
Great for cute animal stickers |
|
Jazza’s Character Design Masterclass |
Character design |
Builds memorable sticker characters |
|
The Master Guide to Drawing Anime |
Anime templates |
Perfect for kawaii sticker styles |
|
Pinterest Board: How to Draw |
Step-by-step guides |
Inspires new sticker ideas |
Keep practicing, stay curious, and let your creativity shine!
FAQ
How do I make my stickers look extra cute?
Try using big eyes, round shapes, and soft colors. Add blush marks or tiny smiles. Simple designs often look the cutest. You can also add sparkles or hearts for extra charm!
Tip: Look at your favorite stickers for inspiration and try to copy their style.
Can I draw stickers without a tablet or iPad?
Yes! You can use paper, pencils, and markers. Draw your design, color it, and cut it out. Use sticker paper or tape to turn your art into real stickers. You do not need fancy tools to start.
What is the best paper for homemade stickers?
Full-sheet label paper works great for most projects. You can also use vinyl sticker paper for waterproof stickers. If you want a quick DIY, regular paper with clear tape on top can work too.
How do I stop my stickers from smudging?
Let your ink dry before touching your stickers. Use waterproof pens or markers. If you print your stickers, choose the right paper setting. You can also cover your stickers with clear tape or laminate sheets for extra protection.
See Also
Master The Art Of Creating Amazing Roblox Designs
A Complete Guide To Making Impressive Roblox Fan Art
Detailed Instructions For Personalizing Your Roblox Characters
Ways To Personalize Your Roblox Cursor Using Red Themes
Guide To Downloading And Editing Orange Cursors On Roblox


