Tutorial: How to CREATE Custom R6 Animations IN Roblox Studio

Introduction
Roblox Studio offers creators the ability to customize R6 animations to make their games more unique and engaging. In this tutorial, you will learn how to replace default R6 animations with custom ones, enabling you to add a personal touch to your Roblox games. By following the steps outlined in this tutorial, you’ll be able to create and implement custom R6 animations in Roblox Studio, enhancing the overall gaming experience for your players.
Setting Up R6 in Roblox Studio
First, click on “game settings” and change the Avatar type from R15 to R6. This will prompt you to save your game if it’s not already saved.
Next, go to the Avatar tab, click on the rig Builder, and insert an R6 rig type rig.
Use the animation editor to create custom R6 animations. For example, you can create a walk animation, idle animation, and jump animation.
After creating the animations, click on the three dots in the animation editor and set the animation priority accordingly. For the walk animation, set the priority to “movement”, for the idle animation, set it to “idle”, and for the jump animation, set it to “core”.
Publish the animations to Roblox and copy the animation IDs for each animation.
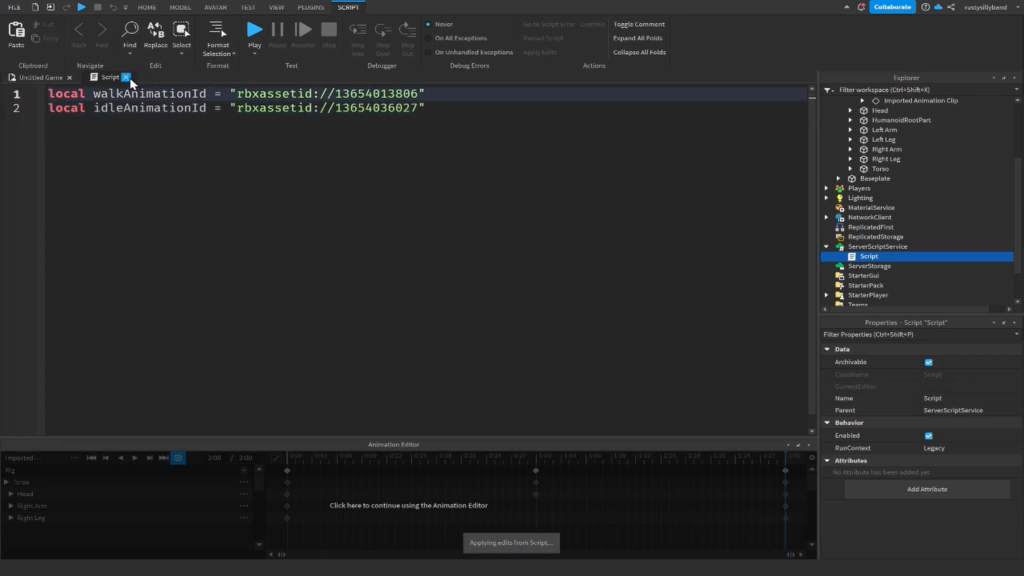
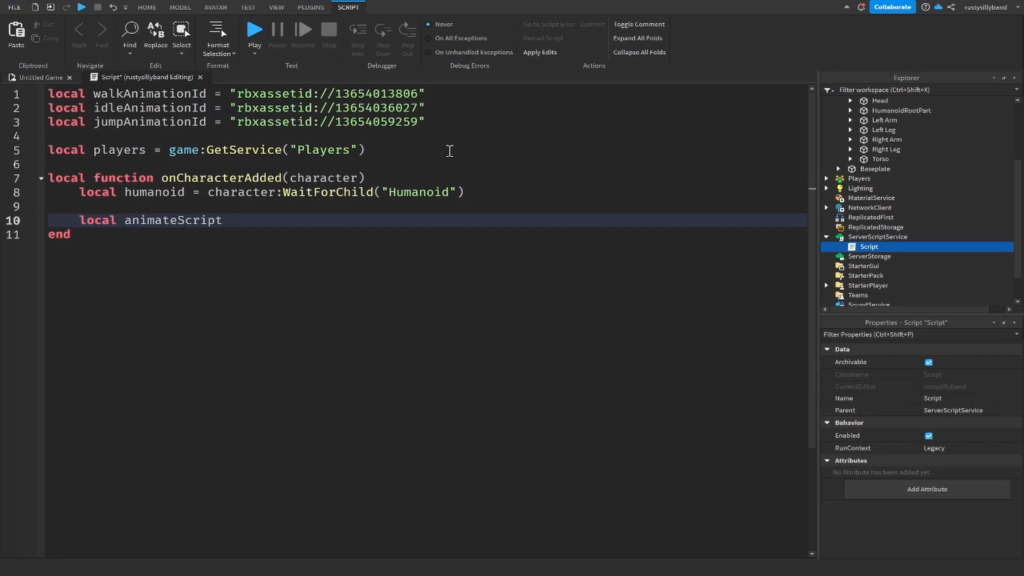
Insert a script into the server script service and define variables for the animation IDs.
Create a function for when a character gets added, and within this function, access the animate script and change the animation IDs to the custom R6 animations you created.
Create another function for when a player gets added, and connect it to the player added event to ensure that the custom animations apply to all players joining the game.
Test the game to see the custom R6 animations in action.

Creating Custom Animations
Creating custom R6 animations in Roblox Studio is an exciting way to add a personalized touch to your games. Using the Animation Editor, creators can replace default R6 animations with their own custom ones.
Here’s a step-by-step guide to creating custom R6 animations:
- Click on “game settings” and change the Avatar type from R15 to R6. Save your game if prompted.
- Access the Avatar tab and click on the rig Builder to insert an R6 rig type rig into your workspace.
- Use the Animation Editor to create custom animations such as walk, idle, and jump animations.
- Set the animation priorities accordingly, such as “movement” for walk animation, “idle” for idle animation, and “core” for jump animation.
- Publish the animations to Roblox and copy the animation IDs for each animation.
- Insert a script into the server script service and define variables for the animation IDs.
- Create a function for when a character gets added, and within this function, access the animate script and change the animation IDs to the custom R6 animations you created.
- Create another function for when a player gets added, and connect it to the player added event to ensure that the custom animations apply to all players joining the game.
- Test the game to see the custom R6 animations in action.

Creating a Walk Animation
To create a custom walk animation in Roblox Studio, follow these step-by-step instructions:
- Click on “game settings” and change the Avatar type from R15 to R6. Save your game if prompted.
- Access the Avatar tab and click on the rig Builder to insert an R6 rig type rig into your workspace.
- Use the Animation Editor to create a custom walk animation.
- Name the animation and click on “Create”.
- Adjust the animation by turning on looping and setting the animation priority to “movement”.
- Publish the animation to Roblox and copy the animation ID.
- Insert a script into the server script service and define a variable for the animation ID.
- Create a function for when a character gets added, and within this function, access the animate script and change the animation ID to the custom walk animation you created.
- Create another function for when a player gets added, and connect it to the player added event to ensure that the custom animation applies to all players joining the game.
- Test the game to see the custom walk animation in action.
Adjusting Animation Properties
After creating custom R6 animations in Roblox Studio, the next step is adjusting animation properties to ensure they work seamlessly in your game. Here’s how you can make the necessary adjustments:
- Open the Animation Editor and create your custom animations, such as walk, idle, and jump animations.
- For each animation, ensure that looping is turned on for smooth and continuous playback.
- Set the animation priority to “movement” for walk animations, “idle” for idle animations, and “core” for jump animations to control when each animation is triggered within the game.
- Publish each animation to Roblox and copy the animation IDs for scripting purposes.
- Insert a script into the server script service in Roblox Studio and define variables for each animation ID.
- Create a function for when a character gets added, and within this function, access the animate script and change the animation IDs to the custom R6 animations you created.
- Create another function for when a player gets added, and connect it to the player added event to ensure that the custom animations apply to all players joining the game.
- Test your game to see the custom R6 animations in action, ensuring that they play as intended.
Publishing the Animation
After creating custom R6 animations in Roblox Studio, the next step is to publish the animations and integrate them into your game. Here’s a step-by-step guide to publishing and implementing your custom R6 animations:
- Click on the three dots in the animation editor and set the animation priority accordingly. For the walk animation, set the priority to “movement”, for the idle animation, set it to “idle”, and for the jump animation, set it to “core”.
- Publish each animation to Roblox and copy the animation IDs for each animation.
- Insert a script into the server script service and define variables for each animation ID.
- Create a function for when a character gets added, and within this function, access the animate script and change the animation IDs to the custom R6 animations you created.
- Create another function for when a player gets added, and connect it to the player added event to ensure that the custom animations apply to all players joining the game.
- Test your game to see the custom R6 animations in action, ensuring that they play as intended.
Scripting the Animations
After creating custom R6 animations in Roblox Studio, the next step is scripting these animations to ensure they work seamlessly within your game. By inserting a script into the server script service, creators can define variables for each animation ID and create functions for when a character or player gets added, connecting them to the respective events to apply the custom animations to all players joining the game.
Here’s a step-by-step guide to scripting the custom R6 animations:
- Insert a script into the server script service and define variables for each animation ID.
- Create a function for when a character gets added, and within this function, access the animate script and change the animation IDs to the custom R6 animations you created.
- Create another function for when a player gets added, and connect it to the player added event to ensure that the custom animations apply to all players joining the game.
- Test your game to see the custom R6 animations in action, ensuring that they play as intended.

Adding Player and Character Functions
After creating custom R6 animations in Roblox Studio, the next step is to add player and character functions to ensure that the custom animations seamlessly apply to all players joining the game. By connecting specific events and scripting the animations, creators can enhance the overall gaming experience for their players.
Creating a Function for When a Character Gets Added
Creators can establish a function to trigger when a character is added to the game. Within this function, they can access the animate script and change the animation IDs to the custom R6 animations that were created.
Creating a Function for When a Player Gets Added
By connecting a function to the player added event, creators can ensure that the custom animations apply to all players joining the game. This function ties the custom animations to the player’s character, providing a seamless gaming experience.
Testing the Custom R6 Animations
After implementing the player and character functions, creators should thoroughly test the game to ensure that the custom R6 animations play as intended. This step allows them to identify any potential issues and make necessary adjustments for a smooth gameplay experience.
Changing Animation IDs
When creating custom R6 animations in Roblox Studio, it’s essential to change the animation IDs to seamlessly integrate them into your game. Here’s a step-by-step guide to changing animation IDs:
- After creating your custom animations, click on the three dots in the animation editor and set the animation priority accordingly.
- For each animation, publish it to Roblox and copy the animation IDs for scripting purposes.
- Insert a script into the server script service and define variables for each animation ID.
- Create a function for when a character gets added, and within this function, access the animate script and change the animation IDs to the custom R6 animations you created.
- Create another function for when a player gets added, and connect it to the player added event to ensure that the custom animations apply to all players joining the game.
- Test your game to see the custom R6 animations in action, ensuring that they play as intended.
Testing the Custom Animations
After creating custom R6 animations in Roblox Studio, the next step is to test the animations in your game to ensure they play as intended. Testing is crucial to identify any potential issues and make necessary adjustments for a seamless gaming experience. Here’s how you can test the custom R6 animations:
- Join your game to see the custom walk animation in action.
- Observe the idle animation to ensure it plays smoothly when your character is stationary.
- Test the jump animation to confirm that it triggers correctly when your character jumps.
- Identify any discrepancies or issues in the animations and make adjustments as needed.


