How To Give Robux To Friends: The Ultimate Tutorial
Introduction
Are you looking to give Robux to your friends on Roblox? In today’s tutorial, I’ll walk you through the process step by step to make it as easy as possible. Robux can be a valuable currency in the world of Roblox, and being able to share it with your friends can enhance your gaming experience. By following this guide, you’ll be able to give Robux to your friends in no time!
Creating a Group on Roblox
Creating a group on Roblox is the best way to transfer Robux to your friends. Here’s a step-by-step guide to creating a group and using it to send Robux:
- Start by logging into your Roblox account and navigating to the “Groups” section.
- If you don’t already own a group, you can create one by clicking on “Create Group” and following the prompts to name your group, add a description, upload an emblem, and pay 100 Robux to create the group.
- Once you have your group, head to the “Store” section within the group.
Selling Items in the Group
Now that you have your group set up, the next step is to sell items within the group in order to transfer Robux. Here’s how to do it:
- Click on “Create or Manage Group Items” to start selling items in your group.
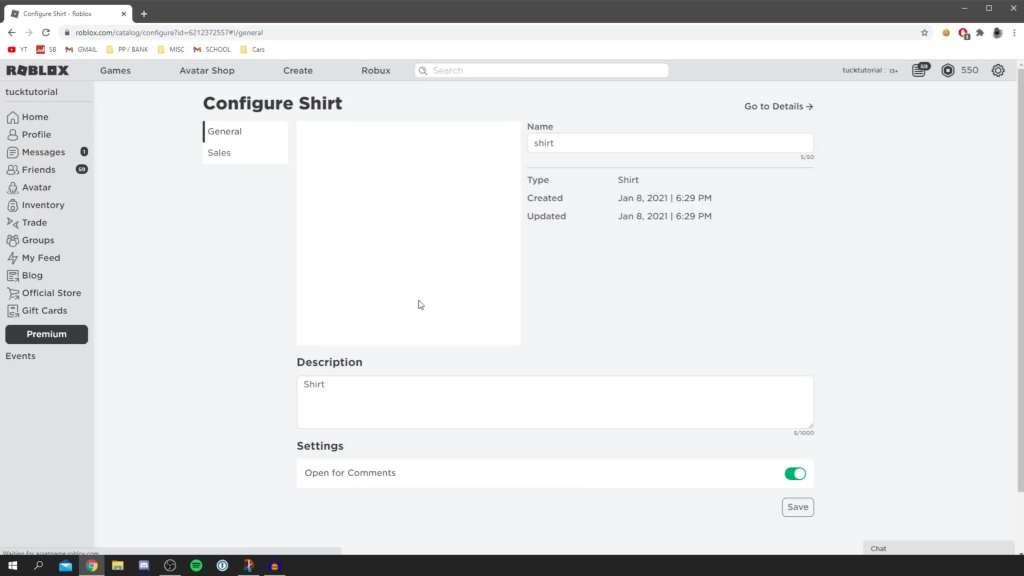
- You can choose to create a shirt or other clothing item to sell within the group. Download the template and create your item using an image editing program.
- Once your item is created and uploaded, configure it by setting the price and making it available for sale.
Setting Up the Group Store
To set up the group store to enable transferring Robux to your friends, follow these steps:
- After creating a group, navigate to the “Store” section within the group.
- Ensure that there are items available for sale in the group’s store.
- Make sure to configure the items by setting the price and making them available for purchase.
Uploading and Selling Items in the Group Store
Once you have your group set up, the next step is to upload and sell items within the group store in order to transfer Robux. Here’s how to do it:
- Click on “Create or Manage Group Items” to start uploading and selling items in your group store.
- Choose to create a shirt or other clothing item to sell within the group. Download the template and create your item using an image editing program.
- Once your item is created and uploaded, configure it by setting the price and making it available for sale.

Understanding Robux Tax
When transferring Robux to your friends through a group on Roblox, it’s important to understand the concept of Robux tax. As mentioned in the video, Roblox imposes a 30% tax on all Robux transactions. This means that for every Robux you sell within the group, you will only receive 70% of that amount in your group funds. The remaining 30% goes to Roblox as a transaction fee.
This tax is automatically deducted when you sell items within your group’s store, so it’s essential to keep this in mind when setting prices for your items. For example, if you want to transfer 100 Robux to a friend, you will need to sell items totaling 143 Robux in order to account for the 30% tax and have the full amount available for payout.
It’s also worth noting that the Robux received from sales will initially show as “pending” in your group funds. It typically takes a couple of days for the pending Robux to become available for payout. Once the funds are available, you can then initiate a one-time payout to transfer the Robux to your friend.
Completing the Sale and Generating Group Funds
Once the pending Robux becomes available in your group funds, you can initiate a one-time payout to transfer the Robux to your friend. Here’s how to complete the sale and generate group funds:
- Navigate to the “Revenue” section within your group.
- Click on “Payouts” and then select “One-time Payout”.
- Enter the username of the recipient and the amount of Robux you want to transfer.
- Ensure that the recipient is a member of the group to receive the payout.
Initiating a Payout
Now that you have successfully completed the sale and generated group funds, let’s walk through how to initiate a payout to transfer the Robux to your friend. Follow these steps to initiate a payout:
- Navigate to the “Revenue” section within your group.
- Click on “Payouts” and then select “One-time Payout”.
- Enter the username of the recipient and the amount of Robux you want to transfer.
- Ensure that the recipient is a member of the group to receive the payout.
Selecting the Recipient
Before you can transfer Robux to your friend, it’s essential to ensure that the recipient is a member of the group. To do this, you’ll need to have your friend join the group to receive the payout. Once they are a member of the group, you can proceed with initiating the payout and transferring the Robux to them.
Sending Robux to Friends
Sending Robux to your friends on Roblox can enhance your gaming experience and allow you to share the wealth of Robux. The process involves utilizing a group on Roblox to transfer Robux to your friends. Here’s a step-by-step guide on how to send Robux to your friends:
- Ensure that you have a group on Roblox. If you don’t have one, create a group by following the prompts to name your group, add a description, upload an emblem, and pay 100 Robux to create the group.
- Head to the “Store” section within your group to start selling items in your group store as a means of transferring Robux.
- Create or manage group items and choose to create a shirt or other clothing item to sell within the group. Download the template, create your item, set the price, and make it available for sale.
- Once the items are successfully sold within the group, the Robux will be pending in your group funds. It typically takes a couple of days for the pending Robux to become available for payout.
- Initiate a one-time payout by navigating to the “Revenue” section within your group, clicking on “Payouts”, and then selecting “One-time Payout”. Enter the username of the recipient and the amount of Robux you want to transfer.
Important Considerations
When considering giving Robux to friends on Roblox, there are several important factors to keep in mind. Here are some key considerations to be aware of:
- Group Ownership: As the tutorial emphasizes, owning a group on Roblox is essential for transferring Robux to friends. If you don’t already own a group, you’ll need to create one and pay 100 Robux to establish it.
- Robux Tax: It’s crucial to understand that Roblox imposes a 30% tax on all Robux transactions within a group. This means that you will only receive 70% of the amount for every Robux you sell within the group, with the remaining 30% going to Roblox as a transaction fee.
- Pending Robux: After completing a sale within your group’s store, the Robux received from sales will initially show as “pending” in your group funds. It typically takes a couple of days for the pending Robux to become available for payout.
- Recipient Membership: To transfer Robux to a friend, the recipient must be a member of the group. Therefore, it’s important to ensure that your friend joins the group before initiating the payout.
Conclusion
After following these steps, you should now have a clear understanding of how to give Robux to your friends on Roblox. By utilizing a group on Roblox, you can transfer Robux to your friends and enhance your gaming experience. Keep in mind the important considerations, such as group ownership, Robux tax, pending Robux, and recipient membership, to ensure a smooth transfer process. With this newfound knowledge, you can now share the wealth of Robux with your friends and enjoy the benefits it brings to your gaming adventures. Remember, patience is key as pending Robux typically takes a couple of days to become available for payout. Now, go ahead and send some Robux to your friends, and have fun gaming together!


